|
Trouble Ticket Express
New
Users Click Here
Access our Knowledge Base
About Us
Services
Training
|
Configuring Email Software
If you don't have E-mail software, you can download Eudora for free. Choose which e-mail software you are using.
Eudora Light
Eudora Pro
Netscape Mail
Microsoft Exchange
Microsoft Outlook
Setup
Instructions for Eudora
The following instructions will work for Eudora Light and Eudora Pro.
- Start Eudora
- Select the "Tools" menu and click on "Options"
- Click on the "Getting Started" icon.
- In the "POP Account" field, put in your Account
- NO QUOTES ARE NEEDED!
- Under "Real Name" put whatever you like.
- Click the "Personal Information" icon.
- If you have Catch-all e-mail, then in the "Return Address" field, put whatever address you wish at your domain. This has no effect on sending your mail. What this controls is what address people will see and what address they will reply to. You should not put your POP account in this field.
- If you have a Webmail individual POP account, you will have been given an e-mail address and POP account. Do not put your POP account in the "Return Address" field. Put your e-mail address.
- Click on the "Hosts" icon.
- In the "SMTP" field you will need to put in the SMTP (Simple Mail Transfer Protocol) server "smtp.WorldsFastestEmail.com". NO QUOTES ARE NEEDED! Do not put your domain name here. See sending mail for more information.
- Click on the "Checking Mail" icon
- Choose whether to have your mail remain on your server or be moved to your hard disk. This is controlled by the "leave mail on server" box. (We very strongly recommend that you always take your mail off the server, i.e. make sure the "leave mail on server" button is UNchecked, or it can get backlogged very easily).
- Click on the "Sending Mail" icon (scroll down).
- Check the settings that you prefer.
|
For more information regarding Eudora Settings and other special features check out Qualcomm's Eudora site.
Top of Page
Installing and Setting Up Eudora Light
Installation
- Download file to a directory.
- Double-click on file once downloaded to begin installation.
- Press Next to continue.
- Read license and press Yes to continue.
- Press Yes to accept the default directory of C:\Eudora.
- Choose your O/S (Win95/NT or Win3.0) and press Next.
- Press Next to copy files.
- Choose Yes or No to view the readme file.
|
 |
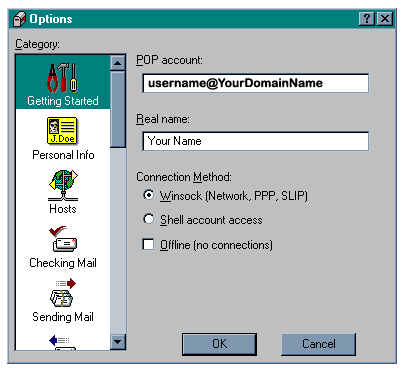
Setup
- Open Eudora Light from the Start menu under Programs.
- Decide if you want Eudora to be your default mail reader.
- Once the program is open then go to Tools and choose Options.
- Under Getting Started
fill out the information as shown.
| 
|
|
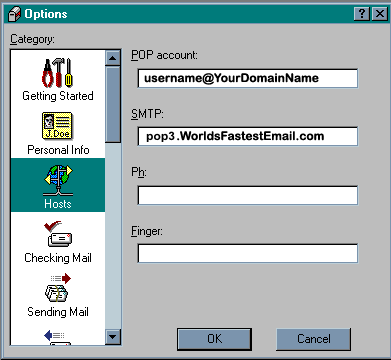
- Fill out the information under Hosts as shown.
- This information is the least you need to fill out in order to send and receive e-mail.
- You can fine tune Eudora Light to meet your personal needs by reading the Help Files and making the appropriate settings.
|
Top of Page
Setup Instructions for Netscape Mail
These instructions were compiled for the mail client that comes with Netscape 3.0.
- Start Netscape (If you're reading this, it's probably already running).
- Select the "Options" menu and click on "Mail and News Preferences"
- Click on the "Servers" section.
- In the "Incoming Mail (POP3) Server" field, put in your POP3 Server. This is the part of your POP Account that comes after the '@' symbol. Your POP3 Server is "mail.worldsfastestemail.com".
- NO QUOTES ARE NEEDED!
- In the "POP3 User Name" field, put your POP3 User ID. This is the first part of your POP Account, before the '@' sybmol.
- In the "SMTP" field you will need to put in the SMTP (Simple Mail Transfer Protocol) server "smtp.WroldsFastestEmail.com". NO QUOTES ARE NEEDED! Do not put your domain name here. See sending mail for more information.
- Choose whether to have your mail remain on your server or be moved to your hard disk. This is controlled by the radio buttons "Removed from the server" and "left on the server." (We strongly recommend that you always take your mail off the server, i.e. make sure the "Removed from the server" button is checked, or it can get backlogged very easily).
- Click on the "Identity" tab.
- Under "Your Name" put whatever you like.
- If you have Catch-all e-mail, then in the "Reply-to-ddress" and "Your E-mail" fields, put whatever address you wish at your domain. This has no effect on sending your mail. What this controls is what address people will see and what address they will reply to. You should not put your POP account in this field.
- If you have a Webmail individual POP account, you will have been given an e-mail address and POP account. Do not put your POP account in the "Your E-mail" or
"Reply-to-address" fields. Put your e-mail address.
For more information regarding Netscape Mail and other special features check out Netscape's information page.
|
Top of Page
Setup Instructions for Microsoft Exchange
If you want to use Microsoft Exchange, then first make sure you have Internet Mail installed.
- Start Microsoft Exchange.
- Select Tools-->Services-->Internet Mail-->Properties
- For "Full Name," put whatever you like.
- For "E-mail address"
- If you have Catch-all e-mail, then in the "E-mail Address" field, put whatever address you wish at your domain. This has no effect on sending your mail. What this controls is what address people will see and what address they will reply to. You should not put your POP account in this field.
- If you have a Webmail individual POP account, you will have been given an e-mail address and POP account. Do not put your POP account in the "E-mail Address" field. Put your e-mail address in.
- Mailbox information:
- In the "Internet Mail Server" field, put in your POP3 Server. This is the part of your POP Account that comes after the '@' symbol. Your POP3 Server is "WorldsFastestEmail.com".
- NO QUOTES ARE NEEDED!
- In the "Account Name" field, put your POP3 User ID. This is the first part of your POP Account, before the '@' sybmol.
- Password: your password
- Now click on "Advanced Options." Where it says "Forward all outbound mail to the following mail server" you must put the SMTP (Simple Mail Transfer Protocol) server "smtp.WorldsFastestEmail.com". NO QUOTES ARE NEEDED!
- Do not put your domain name here.
- Do not leave this field blank. See sending mail for more information.
|
Top of Page
Setup Instructions for Outlook
Setting Up Your Microsoft Outlook Mail Client for the First Time
- The first time you run Microsoft Outlook, you will have to add an Information Service to a User Profile in order to be able to send and receive mail.
- Before you can add any information, the service must be installed.
- Select Services from the Tools menu.
- On the Services tab, click Add or Properties (if you are changing information that has already been set up). Specifically, in order to receive new mail you will need to add the information to the Internet Mail tab.
- Internet Mail
- Add Personal Information
- Full Name: Your Name
- Email address: (Your Email address, for example, name@domain.com)
- Mailbox Information
- In the "Internet Mail Server" field, put in your POP3 Server. This is the part of your POP Account that comes after the '@' symbol. Your POP3 Server "mail.WroldsFastestEmail.com"
- NO QUOTES ARE NEEDED!
- In the "Account Name" field, put your POP3 User ID.
- Password: your password
|
You are now ready to receive and send mail using Microsoft Outlook.
Reconfiguring Your Microsoft Outlook Mail Client
- Select Services from the Tools menu.
- On the Services tab, click Properties (since you are reconfiguring your mail client you do not need to click Add). Specifically, in order to receive new mail you will need to add the information to the Internet Mail tab.
- Follow the steps outlined above to add the information to the Internet Mail tab.
|
Top of Page
|